Showing posts with label gravel garden. Show all posts
Showing posts with label gravel garden. Show all posts
Garden Benches Refreshed
Many, many years ago at a property that I no longer own, a neighboring farmer teased me when I was painting my old, weathered barn. He said "A little bit of powder, a little bit of paint will make it look like what it ain't."
It was true that the old barn had warped boards and a rusty metal roof. It needed more help than a coat of paint. Fortunately, my metal garden benches were showing only a bit of rust and faded color—easily remedied by a good scrubbing and a coat of fresh paint. After seven years in the garden, I was ready to use some color.
I bought the spray paint, Valspar® Satin Leafy Rise, as my color of choice. It's a pale green that looks so much cooler than the dark bronze of the cottage garden bench or the black of the gravel garden bench. I also painted a rusty metal plant stand and a pot.
Garden View from Street and Above
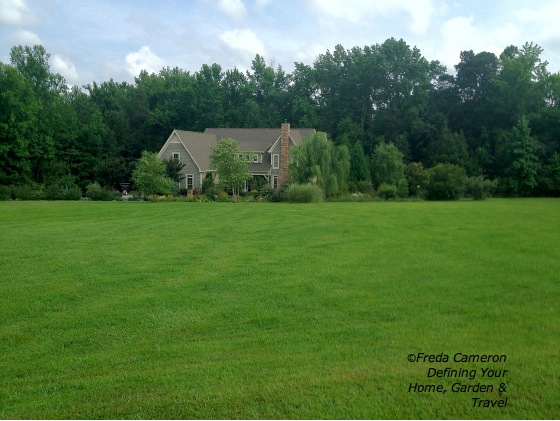 |
| Left of house is west and driveway with entry gravel garden. Right is east with the red/white and orange/yellow flowers. Front is south-facing with 2 acres of open meadow grass. There is no garden in the back (north) as our woods (2.5 acres) come up to the back deck. |
 |
| Paved driveway (west) ends in the gravel entry garden. |
The gravel entry garden is the first thing a visitor sees when arriving. There is sufficient space for a car to park in front of the bench. In a few years, the dwarf Burford 'nana' hollies will create a hedge to separate the gravel garden from our concrete parking area for our garage. A large oakleaf holly and a crepe myrtle flank the bench area. A row of rosemary lines the opposite side of the gravel parking space.
The Red and White Garden
 |
| OVERVIEW: Red and white garden, straight ahead, left. Orange and yellow garden on the near left by a new path cut-through. Green shrubbery (osmanthus fragrans and hollies) on the right. June 2012 |
The "red" in my "red and white garden" is delivered through monarda 'Jacob Cline' along with a mass planting of bright red salvia greggii, crocosmia 'Lucifer'. The red salvia blooms first, followed by the monarda, then the crocosmia.
The white daisies are planted uphill and for now, provide most of the "white" in this garden. Note: A yellow-blooming St. John's Wort shrub (left of the bench) provides the axis between the "red and white garden" and the "orange and yellow garden." The yellow centers of the daisies tie in with the yellow blooms of the shrub.
Blooms in the Gravel Garden
 |
| The hollies in the foreground will mature to create a hedge behind the bench. May 2012. |
Je ne regrette rien. I regret nothing. The conversion of several hardwood mulched garden beds and gravel parking space to one large gravel garden is working. Over one year later and I'm a very happy gardener. The history of the gravel garden can be viewed with this link.
Gravel gardens aren't for everyone. We don't live in the southwest or west coast where gravel is widely used. This is the southeast where folks love lush lawns, flower-packed or woodland gardens.
We live on a large rural property of over four acres with two acres of meadow grass out front while the back half is in woods. We have a sufficient proportion of soft grass, forest and gardens to balance the portion of gravel used.
Our house is English-inspired, but adapted for our climate. The same is true for the gravel garden. The inspiration comes from England, but it must work here in the southeastern United States. When using gravel, I had to use something locally quarried to be affordable. No expensive pea gravel here. Our house is gray cedar shakes. Our gravel is gray.
 |
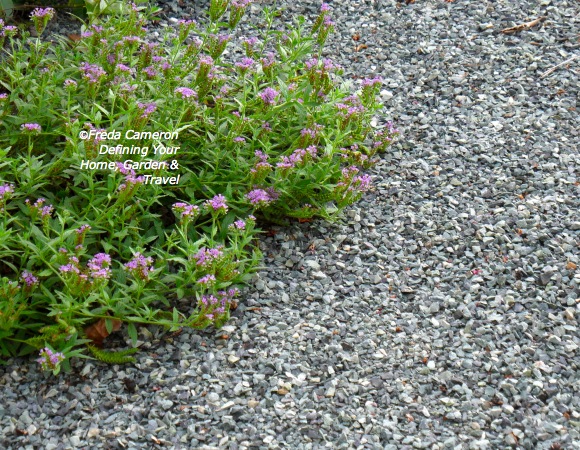
| Looking through container lavender to a low hedge or rosemary. Purple Japanese iris grow from the gravel in the dry stream. Buddleia hedge in the gravel garden along the meadow edge. May 2012. |
 |
| Rosemary, Japanese iris, Buddleia are all thriving with gravel instead of hardwood mulch. May 2012. |
 |
| The gravel entry garden is easy to keep tidy and weed-free. View is looking away from the house to the driveway. May 2012. |
Yes there are a few weeds now and then. The roots have to reach a long way down to find soil. A gentle tug and wiggle easily removes unwanted weeds.
So far, I've not watered the shrubs, herbs or perennials that are planted in the gravel. The exception was to get the rosemary and hollies for the hedge established with one or two waterings around the time of planting. The buddleia, crepe myrtles, existing hollies, nepeta, salvia greggii and Japanese irises were already mature and have not been watered at all since we added the gravel in April 2011.
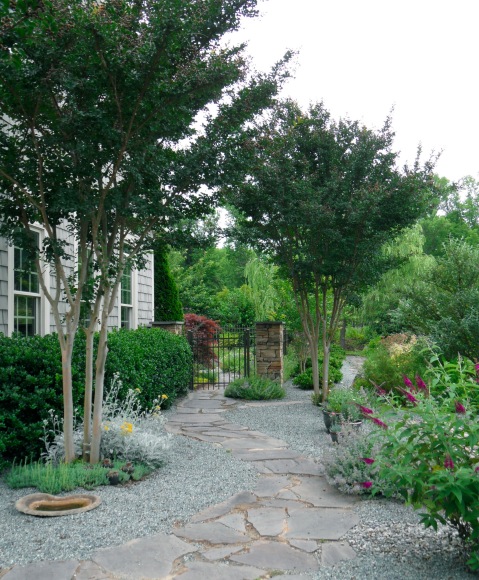 |
| View (from rosemary hedge) to cottage garden front gate. Existing hollies, sedum and dusty miller around crepe myrtle (left). Nepeta, patches of thyme (front & right) were existing. May 2012 Containers on right are barely visible (see next photo). |
 |
| April 2012, containers were added beside flagstone path. Euphorbia (front) container hasn't done well and will be replaced. Lavender (middle) is now in bloom. Salvia (large container) has been blooming non-stop. |
To keep the gravel from looking stark in some spots, I'm gradually adding containers of plants that are drought-tolerant. The salvia jamensis hybrid (large container) and lavenders (various containers), junipers and succulents are doing great.
We've been getting regular rainfall so far this year, so I've not had to water the containers. Even without rain, I've selected plants that don't need to be watered often and I'm enjoying the low-maintenance. All plants used in the gravel garden, whether planted in containers or in the ground, are deer resistant.
Perhaps one of the best rewards from changing to this gravel garden is that so much of my time has been freed up to focus on the deer resistant meadow garden and the cottage garden. (We also changed the mulched flagstone paths to gravel/flagstone paths along the deer resistant meadow garden in March 2012.)
Due to this gravel garden and path conversion, I've not been working in the garden full-time. This redesign has considerably downsized the work that I was doing when I tried to grow more plants in many beds along the driveway, parking area and sidewalk—not to mention all the weeding that I had to do in the mulched paths along the deer resistant garden!
Gardening has been much for fun for me in 2012. Je ne regrette rien.
 |
| Along the dry stream, a clump of existing monarda will soon bloom. The salvia greggii is also quite happy to mulched with gravel. May 2012. |
The Gravel Garden Expansion
| We're rocking around the garden again! After the April 2011 gravel garden project proved to be such a success, we were shoveling and raking again on the first sunny days of a very early spring. I have to be more specific with the work credit—my husband did the heavy hauling and shoveling and I raked the gravel to smooth it into place. We did nothing to the last year's garden (photo below, click to enlarge) except raked it a bit and tugged out a few weeds that were easy to pull. All the shoveling and raking work of the last week was done to extend the use of gravel in the front entrance, upgrade the path through the deer resistant garden and create a Zen-inspired garden where a chaste tree was removed.
My husband is an enthusiastic supporter of gravel projects because he is in charge of mulching. Over the years, the application of hardwood mulch had to be repeated at least twice a year. That was a lot of work and expense. Voles love to tunnel under the hardwood mulch and they were slipping into the garden and devouring nearly every root they found. In Winter 2010, the vole damage was devastating! In Winter 2011, after we'd increased gravel mulch, the vole damage was ZERO! Of course, we still use hardwood and compost mulch in some garden spaces. The maintenance of the gravel garden has been easy and I certainly needed to downsize my work! We've not added gravel to last year's locations and the weeding was minimal. We use a wide plastic rake and a battery-operated blower to keep the gravel clean. The ground beneath the gravel stays relatively moist, making it easy to pull weeds (and flower seedlings). In fact, I easily wiggled out larkspur, poppy and nigella seedlings that were then transplanted into proper spaces in the garden beds. We mulch Japanese irises, monarda, nepeta, salvia greggii, perennial heliotrope, amsonia hubrichtii, rosemary, sedum, buddleia, crape myrtle and hollies with gravel. When I left the irises and monarda in place last year, I was sure that the perennials would bake and die since the gravel garden is in a southwest location. However, the opposite happened! I never once provided supplemental watering to any of the gravel garden plants during the summer drought. The gravel is permeable, allowing water to slowly seep into the soil. The gravel then reflects the sunlight, keeping the soil shaded and moist far better than hardwood mulch. The gravel makes it easy to walk in the garden year-round. It is especially nice on moonlit nights! The Cons of Using Gravel Not everyone likes the look and it's difficult to remove gravel once it is in place. While I'd love to use an expensive pea gravel for a prettier look, the cost is prohibitive, tripling the price of what we are using. The gravel that we use is $50 per CUBIC yard. You must keep the edges separated from grass. Grass will creep and crawl across the top of gravel, so using edging will help keep the grass at bay. We use a flexible metal edging (dark brown color) that is easy to drive into soil using the provided stakes and a rubber mallet. If you've got rock beneath your soil, it will be more difficult. You must have a way to keep the gravel from washing away during heavy rains. We have buried French drains around our entire garden perimeter, uphill from all of our gravel.
Entry Garden: We removed the unwanted plants and hardwood mulch on either side of the flagstone walk that leads to the cottage garden gate. In areas where we want in-ground plants, we do not use landscape fabric beneath the gravel. Sedum and dusty miller are at the base of a crape myrtle (on the left behind birdbath). I am going to use container gardens, placed on top of the gravel on the right side. Nepeta, crape myrtle, Japanese irises, amsonia and a clumping bamboo remain planted in the ground. Deer Resistant Garden Path: We set aside our existing flagstone while we worked. We hammered the flexible brown metal edging in the ground. The edging curves along the bottom of the deer resistant garden on the slope on the right side. On the left side, around the carrisa hollies and the crape myrtles, we replaced hardwood mulch with gravel to integrate with the new path. We raked the gravel into place and then placed our flagstones on top.
In that location, we had a large chaste tree that littered the ground with millions of seedlings each year. The seedlings were horrible to pull, requiring a shovel for the long roots. (We transplanted a few offspring out into our grassy meadow where they can no longer cause a problem in the garden.) Removing the large tree freed up my space for the Zen-inspired gravel garden. While it is still a work in progress (I want to add evergreen hollies behind the pagoda and find more large rocks for the edges), we're already enjoying this tranquil space. An existing clumping bamboo (fargesia variety) was left in place. Osmanthus fragrans provide a green, fragrant wall on the left side. Another osmanthus fragrans on the right side creates the entrance to the this garden after passing the willow tree and a garden space filled with red monarda 'Jacob Kline' and crocosmia 'Lucifer'. I must say that the fragrance from the osmanthus is heavenly right now! We moved our curved concrete bench to the space to provide a place to sit. The willow tree, large oakleaf hollies and osmanthus provide afternoon shade.
 Early spring is the perfect time for construction projects. While the edging looks stark right now, the plants will grow and flourish to soften the edges as the garden wakes up from winter, fills in, greens up and blooms. We have some tweaking to do as the gravel settles. We'll level out the flagstones and rake the gravel again after a few rains. Then, we'll enjoy the new space year-round. |


Garden Inspiration: FRANCiful Things I've Seen (Part Two)
 |
| Château Val Joanis winery and gardens. The white rock radiates warmth to the grape vines. Pertuis, France (Provence). April 2011. |
Fanciful and French—here are a few FRANCiful things I've seen.
Part Two. Provence.
We found Château Val Joanis with a little help from our friends on the SlowTravel France Forum, a car and a GPS. The winery is located between Pertuis and Villelaure, twenty-five kilometers north of Aix-en-Provence—our home base village during our April 2011 visit to Provence.
The château gardens are open from April through October and if you are on a driving tour, I recommend that you go a bit off the beaten path to stop by for an hour. The famous Mistral winds were kicking up during our visit on April 12, but as stated on the website, "...the terraced gardens are carved out of the slope and constructed in an area protected from the Mistral winds using stones salvaged from a Roman pool."
 |
| Table vignettes are strategically placed around the garden courtyard. (Click photos to enlarge.) |

The Val Joanis gardens are made up of three terraces. This is a productive garden, with veggies and fruits. Although laid to formal lines, there were touches of fun and whimsy though out the gardens. I was particularly intrigued by the copper post caps and the use of trellises in the gardens to add vertical height as well as provide support for climbing plants.
There is a mix of international influence in the garden. Rusty oriental-style lanterns hang on a parallel trellis across the garden from the copper post caps. There is even an interesting English-style wattle edging. Look closely at the photos to discover the material used instead of woven willow branches.
The garden was started in 1978 by the owner and a landscape architect. The vision was to create a 19th century garden. With paths, pergolas, parterres and arches, it's an inspiration on a smaller scale than many of the mammoth public gardens. Not overrun by tourists, this is a quiet little garden where a visitor can take time to study the plants and structures and watch the gardeners at work.
I've not mentioned the wine! This is a working vineyard and wine-tasting in the gift shop can be enjoyed either before or after your garden visit. The gift shop is also stocked full of interesting Provençal products.
 |
| My favorite whimsy—copper post caps. |

 |
| Take note of the "wattle" edging. Willow branches? No. |
 |
| Rebar is used to make the edging! |
 |
| Every garden needs a red birdhouse! |
 |
| Interesting alignment of vine-covered arches; one arch is within a woven pergola. |
 |
| Wisteria blooms on the long arbor that connects three terraces. The arbor is made from nineteenth century couloir à autruches. |
| Words and photos by Freda Cameron, Defining Your Home, Garden and Travel. Deer and rabbit resistance varies based upon the animal population and availability of food. All company or product or patented names mentioned are registered trademarks, copyrights, or patents owned by those respective companies or persons. |
A Funny Thing Happened in the Gravel Garden
 |
| Newly completed gravel garden. Only the row of small rosemary plants (left side opposite the bench) were added. Photo: April 28, 2011 |
What do I know about gravel gardens? Not mulch!
I don't live in desert areas where gravel gardens are used due to low rainfall. Desert areas in the United States grow the grasses and succulents—cacti, yucca and agave— that come to mind when I think of plants surrounded by gravel.
I don't live in the northern latitudes where gravel keeps plants from rotting in rain while warming up the area from the winter sun. Gardens in Europe use gravel around trees and shrubs and that was primarily where I drew my design inspiration, realizing that it is hot here in the summer with little rain.
My garden is in North Carolina, zone 7b and the idea of a gravel garden was a gamble that I was ready to take in April 2011. The project started as a problem solver as shown in the Before and After: From Driveway to Gravel Garden story. We were really looking more for a beautification solution to reduce maintenance, but have been surprised by the other advantages.
Here is a list of the plants that were left in place BEFORE we switched to gravel, removing all of the organic hardwood mulch:
Burford Nana (dwarf) Holly
Oakleaf Holly
Yucca
Buddleia (multiple varieties)
Crepe myrtle 'Tuscarora'
Osmanthus 'Goshiki'
Iris ensata (multiple varieties)
Monarda 'Blue Stocking'
Chamaecyparis pisifera 'Cream Ball'
Perennial heliotrope
We added a row of new rosemary and decided to take a "wait and see" attitude toward the existing plants. I watered the rosemary a few times to establish a root system.
 |
| The crepe myrtles bloomed and bloomed. The container plantings of lavender, juniper and succulents are thriving. Photo: July 12, 2011. |
Meanwhile, in the cottage garden and the rest of the outer, deer resistant gardens, I've been dragging water hoses and watering cans in an attempt to keep—even my drought-tolerant plants such as agastache, salvia and coneflowers—alive.
Back in the gravel garden, the foliage of the Japanese iris looks splendid and green. The monarda 'Blue Stocking' bloomed gorgeously. Those moisture-lovers didn't get any supplemental water from me. Tucked against buddleia, neither did those plants receive the full onslaught of the sun, but enough sun that made those same plants wither and wilt in the hardwood mulched areas of my garden.
Interesting. I was curious. No watering and virtually no weeds in the gravel garden for three months. No adding of more hardwood mulch to keep the soil moist.
 |
| Perennial heliotrope was literally covered in the gravel and emerged to make a happy ground cover around the Oak Leaf Holly. Photo: July 29, 2011. |
After a recent rainfall of one inch of rain, I dug a hole in the gravel garden; a hole in the deer resistant garden; and, a hole in the cottage garden.
Eleven inches down, the gravel garden soil was moist all the way—even though I had never watered it!
The other gardens had barely an inch of moist soil and ten inches of bone dry powder and I had been struggling to keep those areas watered. If anything, the cottage garden and other outer gardens have better soil than that beneath the gravel plantings.
Can it be that gravel, a permeable surface that allows rain to penetrate also prevents evaporation of moisture, even in day-after-day of 100°F temperatures?
My test is not scientific, but it is definitely making me think carefully about other areas that can handle gravel. Many of my drought-tolerant plants will be happy surrounded by gravel.
Gravel is not temporary! Once in place, especially two inches deep, it is difficult to remove. Therefore, I shall proceed with caution as I convert more areas to gravel to reduce the need for supplemental watering.
It's far too hot to take on a project like this during the summer. I want to also see the performance of the gravel garden plants over the winter as well as whether the weeds will pop up in the gravel. More waiting, but in the meantime, I can honestly say that the gravel garden is making us very happy.
 |
| The rosemary is flourishing. The foliage of the Japanese iris is green (without watering) and the butterfly bushes are happy and healthy. Photo: early morning, July 29, 2011. |
 |
| Guests do park here and the weeds have been so few. Photo: early morning, July 29, 2011. |
 |
| Merge of driveway with garden. Perennial heliotrope skirts the large holly. Photo: early morning, July 29, 2011. |
| Words and photos by Freda Cameron, Defining Your Home, Garden and Travel. Deer and rabbit resistance varies based upon the animal population and availability of food. All company or product or patented names mentioned are registered trademarks, copyrights, or patents owned by those respective companies or persons. |
Before and After: From Driveway to Gravel Garden
Sometimes it takes years of thinking before making a big change.
The area of disappointment was supposed to be a guest parking area separated from our concrete parking pad with an island garden bed. On the other side, there was just a narrow strip of garden due to the installation of a dry stream, necessary after torrential rains washed out all of the original driveway gravel in our first year.
No matter what we planted on either side, the area just never looked inviting because the plants struggled. It's a difficult site for plants. A hot, southwest exposure, but too wet in winter for drought-tolerant plants, led to losses every year. Replant. Repeat. Something else had to be done!
In 2010, we began removing plants in preparation for this big project. We weren't sure exactly what we would do. We drafted many ideas on paper and I searched through volumes of garden and landscape books and magazines. We thought about raised beds and a formal parterre, but that would eliminate the parking area.
Out of our 2010 ideas, we decided to extend the row of hollies (ilex cornuta 'dwarf Burford') along our garage wall to form a hedge along the concrete side of the island bed. When the new hollies reach the size of the existing hollies, we'll have a nice "green fence" to serve as a backdrop.
Throughout our travels to Europe, we realized that in many areas, unable to grow lawns due to lack of rainfall, gravel is used throughout garden areas. Drought-tolerant plants were "mulched" with gravel. There is often no separation between garden/yard, parking areas and entertainment areas. The gravel covers the ground, integrating all the elements. The result is a simplified design.
Gravel is permeable, allowing rain water to reach the soil beneath. With land properly graded, the gravel doesn't wash away during rainstorms. Selecting a locally quarried gravel reduces the cost as well as making the selection "green" since it is not hauled in on trucks from long distances.
Returning from France on April 17, we decided to tackle this project once and for all. I pulled out an English garden magazine that had more photos of gardens mulched with gravel. We hopped in the truck and drove a few miles to our local provider of gravel. We decided to use the same driveway gravel that is standard in our neighborhood so that we wouldn't have to seek approval from our Homeowner's Association. The blue-beige gravel works well next to our sidewalk flagstone and the river rock used in the dry stream and French drain. Our French drain, installed in March 2010, was necessary to prevent erosion of our driveway gravel.
We arranged for screenings, a finely ground gravel, to be delivered (by dump truck). We used the screenings to build up the grade and level the area (with slope for drainage) to prepare for the blue gravel.
For the area to be welcoming, we installed a patio made of pre-formed concrete squares (16 inches square) on top of landscape fabric (to prevent weeds) and the graded screenings.
Opposite the patio, across the "parking area" section, I planted a row of rosemary to make a fragrant, low hedge. Rosemary is often used in xeric settings and can take the sun. The gravel will actually help prevent rotting of the drought-tolerant plant. I dug a trench, mixed in soil, gravel and compost before planting the rosemary in their biodegradable pots.
Once the patio was installed and we had graded the rest of the area with the screenings, we had a dump truck deliver the driveway gravel.
We raked the gravel around the new rosemary and the existing buddleia, hollies (future hedge backdrop), crepe myrtle and large, oakleaf holly.
This project solves a number of problem for us. It reduces maintenance of the area while unifying the garden, driveway and guest parking area. The simplicity of the design cleans up the entrance to our house, making it apparent that guests should enter at the front of the house instead of the side door. Finally, the materials used minimize plant watering while allowing rainwater to soak into the soil below the gravel.
With all of this gravel, there needed to be a "welcome" area. We moved an existing bench to the patio and collected our spare containers. We had two matching containers for each side of the bench, so we purchased two more to make a trio of planters on each side of the bench. We used a square stepping stone (on hand) to elevate an existing container to make it higher than the urn container. (I will pick up a round stepping stone on my next trip to a garden store to make the elevation material less noticeable.)
In the largest, elevated container, I planted blue point juniper (juniper chinesis 'Blue Point') because it is drought-tolerant and does well in containers. Since the juniper is suitable for zones 4-9, it can handle our cold winters in zone 7b, without being taken indoors. Someday, the juniper may outgrow the containers, but that will be many years. Juniper is deer resistant unless there is a shortage of winter food. Being evergreen, I don't expect a problem with regrowth if there is any nibbling.
The urn containers were planted with English lavender (lavandula angustifolis). Again, for drought-tolerance and cold-tolerance, this plant is suitable for zones 5-9. Lavender is deer resistant.
Finally, the low "bowl" containers were planted with succulents. I used "hens and chicks" (sempervivum) and sedum as my experience with these for container plantings in 2010 were quite successful, having wintered well and required minimal water and no replanting for 2011.
This project took about 8 hours of time with two of us working. Raking screenings and gravel was tiring, heavy work, but easily a DIY project. We used four yards of screenings and five yards of gravel because it extends onto the driveway. We will use another five yards of gravel to finish dressing the entire driveway.
The patio, made of pre-cast squares, didn't require special skill beyond leveling. We minimized the expense by using existing containers and bench and using local sources for the all materials.
While I would like to paint these containers and bench in colorful colors to hide the bland brown, that idea was vetoed by my husband! I think a deep purple, matching the lavender blooms, would look great on the urns, don't you?
The area of disappointment was supposed to be a guest parking area separated from our concrete parking pad with an island garden bed. On the other side, there was just a narrow strip of garden due to the installation of a dry stream, necessary after torrential rains washed out all of the original driveway gravel in our first year.
No matter what we planted on either side, the area just never looked inviting because the plants struggled. It's a difficult site for plants. A hot, southwest exposure, but too wet in winter for drought-tolerant plants, led to losses every year. Replant. Repeat. Something else had to be done!
 |
| BEFORE: (View from driveway) Starting in 2005, we tried plantings on either side. Photo is from 2008 and the third iteration of failed plantings. |
Out of our 2010 ideas, we decided to extend the row of hollies (ilex cornuta 'dwarf Burford') along our garage wall to form a hedge along the concrete side of the island bed. When the new hollies reach the size of the existing hollies, we'll have a nice "green fence" to serve as a backdrop.
Throughout our travels to Europe, we realized that in many areas, unable to grow lawns due to lack of rainfall, gravel is used throughout garden areas. Drought-tolerant plants were "mulched" with gravel. There is often no separation between garden/yard, parking areas and entertainment areas. The gravel covers the ground, integrating all the elements. The result is a simplified design.
Gravel is permeable, allowing rain water to reach the soil beneath. With land properly graded, the gravel doesn't wash away during rainstorms. Selecting a locally quarried gravel reduces the cost as well as making the selection "green" since it is not hauled in on trucks from long distances.
 |
| Garden inspiration: Gravel used to integrate garden, path and patio. Tractors drive on the gravel for tending this garden at Chateau Val Joanis in France. April 2011. |
We arranged for screenings, a finely ground gravel, to be delivered (by dump truck). We used the screenings to build up the grade and level the area (with slope for drainage) to prepare for the blue gravel.
 |
| BEFORE: (View from front sidewalk) Gravel parking area after plants removed from each side. Landscape fabric pinned to the ground for patio installation. April 20, 2011. |
Opposite the patio, across the "parking area" section, I planted a row of rosemary to make a fragrant, low hedge. Rosemary is often used in xeric settings and can take the sun. The gravel will actually help prevent rotting of the drought-tolerant plant. I dug a trench, mixed in soil, gravel and compost before planting the rosemary in their biodegradable pots.
Once the patio was installed and we had graded the rest of the area with the screenings, we had a dump truck deliver the driveway gravel.
We raked the gravel around the new rosemary and the existing buddleia, hollies (future hedge backdrop), crepe myrtle and large, oakleaf holly.
This project solves a number of problem for us. It reduces maintenance of the area while unifying the garden, driveway and guest parking area. The simplicity of the design cleans up the entrance to our house, making it apparent that guests should enter at the front of the house instead of the side door. Finally, the materials used minimize plant watering while allowing rainwater to soak into the soil below the gravel.
 |
| AFTER: Gravel used to integrate parking with garden. Small patio installed for a welcoming bench and containers of xeric plants. Space to park a car. Just waiting for the holly hedge to grow to full size. April 28, 2011. |
 |
| AFTER: (View from driveway) Note the hollies against the garage wall. The same hollies are planted behind the bench area and will eventually create a green hedge. April 28, 2011 |
In the largest, elevated container, I planted blue point juniper (juniper chinesis 'Blue Point') because it is drought-tolerant and does well in containers. Since the juniper is suitable for zones 4-9, it can handle our cold winters in zone 7b, without being taken indoors. Someday, the juniper may outgrow the containers, but that will be many years. Juniper is deer resistant unless there is a shortage of winter food. Being evergreen, I don't expect a problem with regrowth if there is any nibbling.
The urn containers were planted with English lavender (lavandula angustifolis). Again, for drought-tolerance and cold-tolerance, this plant is suitable for zones 5-9. Lavender is deer resistant.
Finally, the low "bowl" containers were planted with succulents. I used "hens and chicks" (sempervivum) and sedum as my experience with these for container plantings in 2010 were quite successful, having wintered well and required minimal water and no replanting for 2011.
This project took about 8 hours of time with two of us working. Raking screenings and gravel was tiring, heavy work, but easily a DIY project. We used four yards of screenings and five yards of gravel because it extends onto the driveway. We will use another five yards of gravel to finish dressing the entire driveway.
The patio, made of pre-cast squares, didn't require special skill beyond leveling. We minimized the expense by using existing containers and bench and using local sources for the all materials.
While I would like to paint these containers and bench in colorful colors to hide the bland brown, that idea was vetoed by my husband! I think a deep purple, matching the lavender blooms, would look great on the urns, don't you?
 |
| Containers of drought-tolerant plants include 'Blue Point' Juniper, English lavender and sempervivum with sedum. |
| Words and photos by Freda Cameron, Defining Your Home, Garden and Travel. All company or product or patented names mentioned are registered trademarks, copyrights, or patents owned by those respective companies or persons. |
Subscribe to:
Posts (Atom)
Popular Posts
-
 By Freda Cameron Although the weather has passed for planting, this is a great time to plan a garden with the children in your family. Durin...
 -
 George Washington's Mount Vernon is a reminder of the self-sufficiency of farms of historical significance. Did you know that Washingto...
 -
 Coreopsis ' Star Cluster ' in bloom with companions Eucomis 'Sparkling Burgundy' ( foliage left) echinacea (multiple...
 -
 The image of a table laden with a bountiful harvest isn't just for Thanksgiving. Local farmers' markets and Community Supported Agri...
 -
 There are few plants in the garden that are virtually maintenance-free. My favorite foliage plant is carex hachijoensis 'Evergold' ...
 -
 I tried to make a garden plan when I spread the soil in fall 2006 to create the outer gardens. I researched and researched the right plant...
 -
 Katie and the Giant Cabbage The idea for Katie’s Krops began with a 9 year old girl and a 40 pound cabbage. In 2008 Katie brought home a ti...
 -
 These "green" disfigured coneflowers were removed and destroyed. I didn't plant any new " green bloom " echinace...
 -
 May I see your identification please? Theft comes in many forms and recently garden bloggers have discovered that there are bad guys who wi...
 -
 By Freda Cameron What is the process of working with a professional garden designer? I asked this question at a local garden center that ha...