Showing posts with label home. Show all posts
Showing posts with label home. Show all posts
Coreopsis (and Company) in the Cottage Garden
 |
| Coreopsis 'Star Cluster' in bloom with companions Eucomis 'Sparkling Burgundy' (foliage left) echinacea (multiple varieties back) and purple phlox 'Nicky'. |
Three plants of Coreopsis 'Star Cluster' PPAF were added to my cottage garden in 2011. I was so impressed by the performance and beauty of this coreopsis, that I purchased five more plants this spring.
This 2010 introduction in the Big Bang ™ series is from Darrell Probst. For several years, I've happily grown his taller Coreopsis 'Red Shift' in the deer resistant meadow garden. 'Star Cluster' is shorter at 18-14 inches high and wide, making it more suitable for the scale of my cottage garden.
Garden View from Street and Above
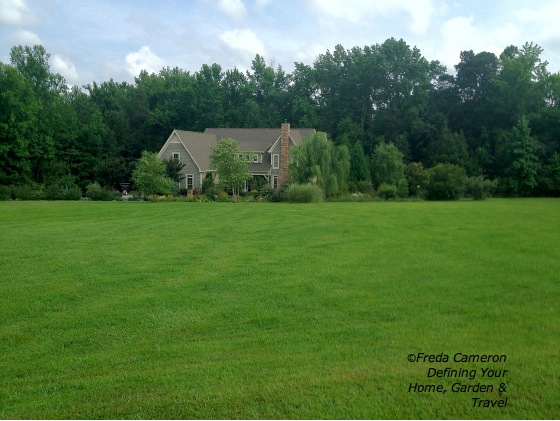 |
| Left of house is west and driveway with entry gravel garden. Right is east with the red/white and orange/yellow flowers. Front is south-facing with 2 acres of open meadow grass. There is no garden in the back (north) as our woods (2.5 acres) come up to the back deck. |
 |
| Paved driveway (west) ends in the gravel entry garden. |
The gravel entry garden is the first thing a visitor sees when arriving. There is sufficient space for a car to park in front of the bench. In a few years, the dwarf Burford 'nana' hollies will create a hedge to separate the gravel garden from our concrete parking area for our garage. A large oakleaf holly and a crepe myrtle flank the bench area. A row of rosemary lines the opposite side of the gravel parking space.
Blooms in the Gravel Garden
 |
| The hollies in the foreground will mature to create a hedge behind the bench. May 2012. |
Je ne regrette rien. I regret nothing. The conversion of several hardwood mulched garden beds and gravel parking space to one large gravel garden is working. Over one year later and I'm a very happy gardener. The history of the gravel garden can be viewed with this link.
Gravel gardens aren't for everyone. We don't live in the southwest or west coast where gravel is widely used. This is the southeast where folks love lush lawns, flower-packed or woodland gardens.
We live on a large rural property of over four acres with two acres of meadow grass out front while the back half is in woods. We have a sufficient proportion of soft grass, forest and gardens to balance the portion of gravel used.
Our house is English-inspired, but adapted for our climate. The same is true for the gravel garden. The inspiration comes from England, but it must work here in the southeastern United States. When using gravel, I had to use something locally quarried to be affordable. No expensive pea gravel here. Our house is gray cedar shakes. Our gravel is gray.
 |
| Looking through container lavender to a low hedge or rosemary. Purple Japanese iris grow from the gravel in the dry stream. Buddleia hedge in the gravel garden along the meadow edge. May 2012. |
 |
| Rosemary, Japanese iris, Buddleia are all thriving with gravel instead of hardwood mulch. May 2012. |
 |
| The gravel entry garden is easy to keep tidy and weed-free. View is looking away from the house to the driveway. May 2012. |
Yes there are a few weeds now and then. The roots have to reach a long way down to find soil. A gentle tug and wiggle easily removes unwanted weeds.
So far, I've not watered the shrubs, herbs or perennials that are planted in the gravel. The exception was to get the rosemary and hollies for the hedge established with one or two waterings around the time of planting. The buddleia, crepe myrtles, existing hollies, nepeta, salvia greggii and Japanese irises were already mature and have not been watered at all since we added the gravel in April 2011.
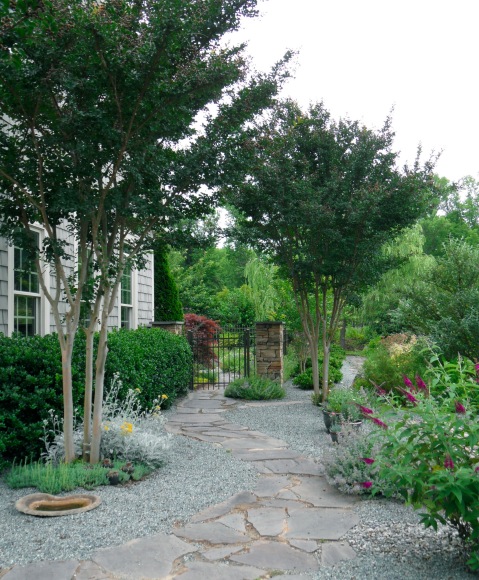 |
| View (from rosemary hedge) to cottage garden front gate. Existing hollies, sedum and dusty miller around crepe myrtle (left). Nepeta, patches of thyme (front & right) were existing. May 2012 Containers on right are barely visible (see next photo). |
 |
| April 2012, containers were added beside flagstone path. Euphorbia (front) container hasn't done well and will be replaced. Lavender (middle) is now in bloom. Salvia (large container) has been blooming non-stop. |
To keep the gravel from looking stark in some spots, I'm gradually adding containers of plants that are drought-tolerant. The salvia jamensis hybrid (large container) and lavenders (various containers), junipers and succulents are doing great.
We've been getting regular rainfall so far this year, so I've not had to water the containers. Even without rain, I've selected plants that don't need to be watered often and I'm enjoying the low-maintenance. All plants used in the gravel garden, whether planted in containers or in the ground, are deer resistant.
Perhaps one of the best rewards from changing to this gravel garden is that so much of my time has been freed up to focus on the deer resistant meadow garden and the cottage garden. (We also changed the mulched flagstone paths to gravel/flagstone paths along the deer resistant meadow garden in March 2012.)
Due to this gravel garden and path conversion, I've not been working in the garden full-time. This redesign has considerably downsized the work that I was doing when I tried to grow more plants in many beds along the driveway, parking area and sidewalk—not to mention all the weeding that I had to do in the mulched paths along the deer resistant garden!
Gardening has been much for fun for me in 2012. Je ne regrette rien.
 |
| Along the dry stream, a clump of existing monarda will soon bloom. The salvia greggii is also quite happy to mulched with gravel. May 2012. |
Blood Grass, Broadway Lights and a Bush
 |
| Spirea 'Magic Carpet' (back) Japanese blood grass 'Red Baron' (middle) Shasta 'Broadway Lights' (front). May 27, 2012. |
While rearranging the garden last fall, I was inspired to move, rather than give up on a Japanese blood grass (imperata cylindrica rubra var. koenigii 'Red Baron') that had been struggling during drought. By the end of summer 2010, the poor thing was looking rather sad and I wasn't sure if it could be saved. Surrounding it with plants to shade its roots seemed the best solution. The red color of the grass echoes the deep red of a spirea 'Magic Carpet' in my garden.
Please note: The species Japanese blood grass is on the noxious weed list of many states. In 2009, the reputation was so bad and the confusion so widespread that a local nursery couldn't sell blood grass. After a few months of waiting, I was allowed to purchase the better-behaving cultivar. If you are shopping for this grass, make sure you purchase imperata cylindrica rubra var. koenigii 'Red Baron'. It is suitable for zones 5-9.
Spirea 'Magic Carpet' has been moved more times than I can count! I think I've finally resolved my color issues with it. The spirea starts out quite orange tips in early spring, then the tip color turns to the deeper red-rust that I love. I have three of these shrubs in the deer resistant garden and there have been no issues with self-sowing. The blooms are a nice pink and I don't deadhead this spirea as I do another variety, 'Neon Flash' (also shown below).
 |
| Beyond the blood grass: Spirea 'Magic Carpet' (front) Stipa grass (middle) Spirea 'Neon Flash' (back). May 6, 2012. |
 |
| Leucanthemum 'Broadway Lights' ™ begins as a soft yellow and lightens to creamy white. Blue ageratum is allowed to roam around the path plants. May 27, 2012. |
My existing leucanthemum 'Broadway Lights'™ turned out to be a pretty good candidate to complete the combination with the spirea and blood grass. I've had this shasta for many years and use it to dot the path in the deer resistant meadow garden. A perennial for zones 5-11, deadheading is not required as the buttery flowers fade to white, but I like to neaten up the plants. The foliage remains evergreen in my zone7b garden.
I snapped today's photo when the first blooms of the shasta were open. Soon, the path in the deer resistant garden will once again be dotted with yellow daisies.
 |
| The leucanthemum clumps are just beginning to bloom along the path. Deer resistant meadow garden. May 27, 2012. |
Garden Inspiration: Great Gates
After a long, leisurely and fabulous Saturday lunch at Plage Keller "Le Cesar" restaurant on La Garoupe Beach, my husband and I strolled along Boulevard Gardiole Bacon. This quiet street on the peninsula, Cap d'Antibes, is lined with villas—more accurately walled gardens that obscure the villas from view. Many of the villas are Provençal style, a common design in this area of France, and quite large and luxurious. Others are Spanish Mediterranean and then there are the modern architectural styles of white boxes. I prefer the traditional styles.
I love garden gates. Even the driveways have gates, and some of those are inspiring. Come along on a stroll down that boulevard as we walked back to Antibes, a distance of about four kilometers, depending upon how many detours we make to snap photos along the way. You see, we justify all the eating by walking!


I love garden gates. Even the driveways have gates, and some of those are inspiring. Come along on a stroll down that boulevard as we walked back to Antibes, a distance of about four kilometers, depending upon how many detours we make to snap photos along the way. You see, we justify all the eating by walking!
| Words and photos by Freda Cameron, Defining Your Home, Garden and Travel. All company or product or patented names mentioned are registered trademarks, copyrights, or patents owned by those respective companies or persons. |
Flipping Frittata! Have No Fear
Cooking is right up there with gardening and travel. The experience alone is rewarding and the result is usually satisfying. There are times when I love to spend hours in the kitchen purely for the creative outlet and enjoyment. I'd love to cook from scratch more often, but with only two in our empty nester household and a desire to remain healthy, I seldom make "big meals" anymore.
My pent up need to cook was released the other day when I decided to make a frittata for dinner, using an early birthday gift from my husband. I tend to use recipes as a loose guide to cooking unless baking a cake where ingredients and measurements must be precise. For most main courses, I add, subtract and substitute ingredients according to whim.
With that flexibility in mind, I embarked on making a frittata with the gift, a Calphalon Unison Slide Nonstick Fritta Pan Set from Williams-Sonoma®. In the past, I've used the stovetop to start a frittata and the oven to finish it. Nothing wrong with that method, but I was never sure if I was undercooking or overcooking the frittata. With the pan set, I can flip the frittata several times to finish the cooking.
A frittata is an egg-based Italian dish that I prefer to make instead of individual omelets and without the fuss of crust or calories of a quiche. Although we like our frittata served hot, it is often served at room temperature.
I have scanned through hundreds of frittata recipes published on the Web and buried in the pages of printed cookbooks in my kitchen for ideas. Once you master the cooking method, you can be creative and use the ingredients that you choose to combine.
Caramelized onions! Oh my, how I love the flavor, so reminiscent of onion tarts in France. With that ingredient on my short list, I started with the Wilted Greens and Gruyère Frittata as the basis for my experiment in mastering the art of flipping a frittata in the pan set without dashing the mixture all over the stovetop.
Thinly sliced yellow onions are required for proper caramelization. I tend to literally cry over this chore, rendering myself too blind to read the recipe while I recover. Using my mandoline makes quick work of onion slicing, producing only a teardrop or two from my eyes while delivering perfectly thin slices. This manual device is worth the investment for anyone who wants to turn out mounds of julienned, cubed or sliced veggies.
To caramelize onions takes an hour and patience. The slow cooking and light browning makes the onions quite sweet, a perfect compliment for the gruyère cheese. These onions are also wonderful for omelets, quiches, savory tarts and pizzas. The good news is that you can prepare the onions in advance. The onions must be cooled before adding to the whisked eggs in the recipe.
I altered the recipe with sautéed shiitake, oyster and baby bella mushrooms. I simply wiped out the pan to sauté the mushrooms once the onions were finished. The recipe also calls for wilted Swiss chard, and I used the same deep side of the frittata pan. If you want to use meat in this recipe, bacon is a good choice. Brown the bacon ahead of time, cool and crumble for delightful flavor.
After whisking eggs and adding all of the cooled ingredients, the mixture is poured into the deep pan. Using a spatula, you have to gently stir the raw eggs quickly at first before they firmly set. This ensures even cooking. Cook over medium heat for 7-10 minutes.
The preheated and seasoned shallow pan is then placed on top, interlocking the rectangular handles. This is where the fun starts as you must swiftly flip the pans so that the deep pan is then on top and the shallow pan on the bottom. Cook for three minutes longer, then flip the frittata back into the deep side.
The frittata was so delicious for dinner! It also refrigerated well and we microwaved individual slices for breakfast and another dinner the follow day. We still didn't finish it! This easily serves six generous slices for a main course or eight slices as a side dish.
I plan to make a frittata for an upcoming brunch to save time and serve more people at one time. Of course, I have a few ideas for other ingredients to use in the next frittata.
As for the flipping—I spilled only a little bit of egg on my first flip of the pans! From now on, I'll have no fear of flipping.
Disclaimer: I assure you that this story is not a paid advertisement, but I am a satisfied customer of Williams-Sonoma® and linked to their site to reference the products that I used to make this recipe. Nothing mentioned has been provided for free.
My pent up need to cook was released the other day when I decided to make a frittata for dinner, using an early birthday gift from my husband. I tend to use recipes as a loose guide to cooking unless baking a cake where ingredients and measurements must be precise. For most main courses, I add, subtract and substitute ingredients according to whim.
With that flexibility in mind, I embarked on making a frittata with the gift, a Calphalon Unison Slide Nonstick Fritta Pan Set from Williams-Sonoma®. In the past, I've used the stovetop to start a frittata and the oven to finish it. Nothing wrong with that method, but I was never sure if I was undercooking or overcooking the frittata. With the pan set, I can flip the frittata several times to finish the cooking.
A frittata is an egg-based Italian dish that I prefer to make instead of individual omelets and without the fuss of crust or calories of a quiche. Although we like our frittata served hot, it is often served at room temperature.
I have scanned through hundreds of frittata recipes published on the Web and buried in the pages of printed cookbooks in my kitchen for ideas. Once you master the cooking method, you can be creative and use the ingredients that you choose to combine.
Caramelized onions! Oh my, how I love the flavor, so reminiscent of onion tarts in France. With that ingredient on my short list, I started with the Wilted Greens and Gruyère Frittata as the basis for my experiment in mastering the art of flipping a frittata in the pan set without dashing the mixture all over the stovetop.
Thinly sliced yellow onions are required for proper caramelization. I tend to literally cry over this chore, rendering myself too blind to read the recipe while I recover. Using my mandoline makes quick work of onion slicing, producing only a teardrop or two from my eyes while delivering perfectly thin slices. This manual device is worth the investment for anyone who wants to turn out mounds of julienned, cubed or sliced veggies.
 |
| V-Blade mandoline produces thin slices of onion in a flash. |
 |
| Cook onion slices slowly to caramelize. You can make these a day ahead and store in airtight jar in the fridge. |
 |
| Almost caramelized, not burned. I used the deep pan in the frittata set for prepping the onions and sautéing mushrooms and wilting Swiss chard. |
I altered the recipe with sautéed shiitake, oyster and baby bella mushrooms. I simply wiped out the pan to sauté the mushrooms once the onions were finished. The recipe also calls for wilted Swiss chard, and I used the same deep side of the frittata pan. If you want to use meat in this recipe, bacon is a good choice. Brown the bacon ahead of time, cool and crumble for delightful flavor.
 |
| The frittata cooking in the deep pan for 7-10 minutes. |
The preheated and seasoned shallow pan is then placed on top, interlocking the rectangular handles. This is where the fun starts as you must swiftly flip the pans so that the deep pan is then on top and the shallow pan on the bottom. Cook for three minutes longer, then flip the frittata back into the deep side.
 |
| Pans are used in unison to flip the frittata. 1. Put shallow pan on top, then flip. Cook 3 minutes. 2. Flip to put deep side back on the bottom. |
 |
| The frittata is ready! |
 |
| With a rubber spatula, I gently loosened the edges. The frittata slipped right onto the plate without sticking to the pan. |
I plan to make a frittata for an upcoming brunch to save time and serve more people at one time. Of course, I have a few ideas for other ingredients to use in the next frittata.
As for the flipping—I spilled only a little bit of egg on my first flip of the pans! From now on, I'll have no fear of flipping.
Disclaimer: I assure you that this story is not a paid advertisement, but I am a satisfied customer of Williams-Sonoma® and linked to their site to reference the products that I used to make this recipe. Nothing mentioned has been provided for free.
| Words and photos by Freda Cameron, Defining Your Home, Garden and Travel. All company or product or patented names mentioned are registered trademarks, copyrights, or patents owned by those respective companies or persons. |
Photo Fun: Come Indoors Where It Is Cool
 |
| Come on back to the family room. |
Every few years, I like to change the "art" on my walls. I use the word "art" in the sense of being creative with what's unique and original in my life, rather than owning any masterpieces. The photos that I've chosen make me smile.
Previously, I've used framed photos from our travels in Italy. Recently, I decided to swap out Italy photos with those from Paris, France.
Architecture is a favorite photographic subject of mine. I'm not a professional photographer, but there are favorite photos that please me enough to view on my walls. Color photos don't really work with our family room color scheme and furniture. Therefore, I use a little photo editing magic (iPhoto® on my MacBook®) to convert my photos to sepia tone for framing. I then upload my photos to Shutterfly® and purchase 8 x 10 prints for under $3.00 per print.
My frames were purchased in 2006, therefore, I didn't have to purchase new frames. All of my frames came from Pottery Barn® and were purchased on sale. The mats were included with the purchase of the frames.
Inexpensive. Unique. Original. Memories.
To decide which of your photos will work, the resolution must be sufficient for the size of the print you want. One of the reasons that I like Shutterfly® is because their software will tell you whether your photo has the quality (in pixels) to be printed anywhere from as large as a poster down to a postcard.
If you go this route, pay attention to the edges of the photos. Shutterfly will ask you if the cropping is okay. They automatically set the cropping, but you may shift your image within the allowed space to ensure that no parts are cut off. Always preview the cropped image online before you put the order in the shopping cart.
 |
| The Louvre original in color, before cropped. |
 |
| The Louvre photo as sepia and cropped. |
 |
| Just a few of my candidates for framing. I created a side-by-side collage to use to decide which photos to print. Not all were chosen. |
 |
| Matted and framed: Top (L to R): The Louvre; Notre Dame Bottom: Saint-Michel; Sacre Coeur Paris, France. |
 |
| The four photos shown on the wall to the right of the family heirloom mirror. |
 |
| On another wall, the photos are related to three different bridges in Paris. These frames are the standard "gallery" style sold by Pottery Barn®. |
| Words and photos by Freda Cameron, Defining Your Home, Garden and Travel. All company or product or patented names mentioned are registered trademarks, copyrights, or patents owned by those respective companies or persons. |
Make Espresso at Home
Need an extra jolt of caffeine to get you started in the morning? It is very easy and inexpensive to make good quality espresso at home in ten minutes.
Come along as The Musician demonstrates how he makes espresso coffee on the stovetop.
Espresso is used for making cappuccino and lattes. All you do is add steamed milk and foam to the espresso shots. If you have a way to steam your skim milk to 140°, then you can make all three coffee beverages.
An espresso cup (shot) is roughly 1/3 of a measuring cup and a regular size cappuccino cup holds two espresso shots, plus milk and foam. Therefore a 4 cup espresso maker will produce 4 espressos or 2 regular size cappuccinos.
What you need to make a simple espresso:
Cappuccino variation:
Come along as The Musician demonstrates how he makes espresso coffee on the stovetop.
Espresso is used for making cappuccino and lattes. All you do is add steamed milk and foam to the espresso shots. If you have a way to steam your skim milk to 140°, then you can make all three coffee beverages.
An espresso cup (shot) is roughly 1/3 of a measuring cup and a regular size cappuccino cup holds two espresso shots, plus milk and foam. Therefore a 4 cup espresso maker will produce 4 espressos or 2 regular size cappuccinos.
What you need to make a simple espresso:
- A stovetop espresso pot. We prefer stainless steel instead of aluminum and purchased the Primula® Stainless Steel Espresso Coffee Maker, 4 cup for around $30 USD at our local Macys®.
- Good quality espresso coffee. Make sure you purchase espresso strength as regular ground coffee will not be good. We select beans at the local shop, A Southern Season®, and have them grind the beans for us. If you can't get fresh espresso coffee, the Illy® brand is very satisfying.
- A tablespoon to measure the ground espresso coffee.
- A stovetop burner.
- Four Espresso cups—or two cappuccino cups if adding steamed milk/foam.
Assembling the pot and heating the espresso:
 |
Fill the bottom of the pot with water per instructions with the espresso maker. Our pot is filled with water to the line just below the screw shown on the front of this section. |
 |
Drop the espresso basket onto the bottom section of the pot. |
 |
Fill basket with espresso. Do not pack tight, loosely smooth. This pot makes 4 espresso shots and uses 2 heaping tablespoons of espresso coffee. |
 |
Screw top of the pot together over bottom/basket. Place over medium low heat. Listen for gurgling sound. When gurgling stops, remove immediately from heat. Pour into 4 ESPRESSO size cups and enjoy! |
- Before espresso is ready—heat 1/2 cup of skim milk to 140° using a special steamer device with a stainless steel pitcher and thermometer. There should be ample foam on top of the milk.
- Hold foam back with a spoon and pour hot milk into 2 cappuccino cups until 1/3 full.
- Spoon foam on top of hot milk until cup is half full.
- Immediately pour hot espresso (2 shots per cappuccino) through the foam in a steady stream.
If you prefer a latte, grab a mug and use all of the espresso, all of the milk and less foam! It's that simple!
Some cappuccino and latte recipes will instruct you to pour the espresso first, then add the milk and foam. We prefer to carefully pour the espresso through the foam and into the steamed milk to mix it without stirring.
As you experiment, you may want to adjust the ratio of espresso, milk and foam to suit your taste.
As you experiment, you may want to adjust the ratio of espresso, milk and foam to suit your taste.
 |
Carefully pour espresso through steamed foam and milk to make a cappuccino. |
| Words and photos by Freda Cameron, Defining Your Home, Garden and Travel. All company or product or patented names mentioned are registered trademarks, copyrights, or patents owned by those respective companies or persons. |
Flowers as Food. What's on Your Plate?

The rosemary is in bloom with hundreds of tiny, blue flowers. Passing by, I can't resist picking a few to eat. The taste is sweet and refreshing. Yes, rosemary flowers are edible and a favorite garden snack!
Reading a garden story about edible flowers in the Guardian reminded me not only of the dainty sugar-coated violets on confections in the spring, but also of other edible flowers in my garden—cottage pinks, lavender, marigolds and nasturtiums.
There's an interesting recipe from Jim Long for Stuffed Tomatoes with Marigold that I'm adventurous enough to try.
For my lavender scones, I purchase Provence culinary lavender from a local farm, but I should grow this variety with all the other lavenders in my garden. I cannot easily describe the flavor of lavender, but it's definitely on the menthol side of taste. A local dairy will sometimes feature lavender chocolate and vanilla ice cream!
| Be careful in the garden. Allergies aren't a problem for me, but everyone should definitely take precautions. Be sure to thoroughly research any flower before eating the petals. There are many poisonous flowers in the garden. If you have small children, it's probably best not to let them see you munching flowers since they cannot tell the difference between the edible and the poisonous. My garden is organic, so no toxic chemicals are sprayed on my plants. |
| More information: Epicurean: Edible Flowers Recipes for Edible Flowers Edible Landscaping |
Chive blossoms, great on omelets, have such a wonderful flavor and I try to cut those as fresh as possible. The light pink color makes a wonderful, edible garnish on dishes that include chopped chives. This is another flower that I love to nibble while working in the garden.
Although I don't have a veggie garden, squash and zucchini blossoms are often on the menus when visiting France and Italy. These flowers wilt so quickly, magic happens in the kitchens to serve up Cheese Stuffed Squash Blossoms.
I grow so many herbs for the foliage, but I've not yet tried the edible flowers of oregano, marjoram, sage officinalis, borage, chamomile and basil.
With my renewed interest in edible flowers, I'm ready to try some new recipes this summer. I can imagine the look on my husband's face when I serve him baked potatoes sprinkled with marigold petals! At least he likes spicy foods.
All links provide more information on the topic of edible flowers. Words and photos by Freda Cameron, Defining Your Home, Garden and Travel.
House Paint Colors
 What's the most popular question that I receive in email from readers and forum friends? What are the paint colors on your house?
During the time that we were building our house(s), I participated on a home building forum. Selecting paint colors was a common topic.
After all these years, I continue to receive the question from forum participants who run across photos of my house... both of them!
Yes, we used the same paint colors (and stone) on two houses that we built. If a color scheme works, why change? The original color scheme came from interior designer, Peggy Jeffers, who worked with our builder.
When my husband and I married in 2002, we sold my house (that I built) and his house (that he built). We bought a 1/2 acre lot and built a Craftsman-inspired house in 2003. After living there a short time, we realized that while we loved the house, we really wanted more land. So, we bought 4.5 acres in 2004 and built the current house in 2005. Building two houses so quickly was just crazy, but we're glad we made the move. Between my husband and I, we've built a lot of houses!
The only difference is that the Craftsman-inspired house had Duron Domino (black) on the sashes and divided lights while the white was used on the framing trim. In the current house, we used the white on the window sashes and divided lights. Both houses have wood windows, so they can be painted.
The 2003 house was in the shade while the current house is in full sun with no shade, so the colors look brighter (the trim looks whiter, the siding looks more gray than gray-green).

♥♥♥
The paint colors are a custom mix, so if you try to use these, please have a small sample made first.
Exterior House Body:
Duron Custom Product #6610511
B-Y8
C-39
V-10
Ultra Deluxe Exterior
100%Acrylic Latex
Deep Base
Exterior House Trim:
Sherwin Williams Exterior Architectural Latex Gloss-Extra White
2088*R Paris White* EW
Colorant 02 32 64 128
Y3 Deep Gold 5 1
N1 Raw Umber 26
Exterior House and Garden Stone:
Cultured stone, Ledgestone Chardonnay (foundation, chimney, fence columns)
Pennsylvania flagstone, Lilac Heather (porch floor, patio, walkways, paths)
♥♥♥
Words and photos by Freda Cameron
Betsy's Cranberry Scones
It's the holiday season, the weather is really cold and I am thinking about baking scones. Not just any scones, but those baked by my friend on one of my visits with her in California.
Once upon a time, Betsy lived here in North Carolina. I can't remember the exact year, but I think maybe 30 years have passed since we packed up her Saab and drove to California. We had a great time on the cross-country road trip and even more fun while I spent a week with her in the Bay Area. I still consider Betsy to be my best friend, even though we may go years without seeing each other in person. Thank goodness for email!
Betsy's Cranberry Scones
Makes 16 scones
Preheat oven to 400°F
3 cups unbleached all-purpose flour
1/2 cup sugar
2 1/2 teaspoons baking powder
1/2 teaspoon baking soda
3/4 teaspoon salt
3/4 cup (1 1/2 sticks) margarine or unsalted butter, chilled and cut into small pieces
3/4 cup dried (or fresh) cranberries
1 teaspoon grated orange zest
1 cup buttermilk
- Combine flour, sugar, baking powder, baking soda and salt in a large bowl.
- Add margarine/butter and beat with an electric mixer (or use pastry blender) until well blended.
- Stir in zest and cranberries.
- Pour in buttermilk and mix until blended.
- Gather dough into a ball and divide in half.
- On lightly floured surface, roll each half into a circle (1/2 to 3/4 inch thick).
- Cut each circle into 8 wedges.
- Place scones on lightly greased cookie sheet.
- Bake in preheated 400° F oven for 12-15 minutes or until golden.
- Serve warm or cooled.
 I have also adapted this recipe to make lavender scones (in photo).
Photos and words by Freda Cameron. Recipe from Betsy Livak.
Free Yourself and Your Oven; Grill the Turkey
It all started with Thanksgiving 2006. Expecting a crowd for the big meal, I couldn't work out a way to get everything in the oven since the turkey was so large.
We had to figure out how to get everything cooked on time. The microwave wouldn't do it. Ah ha! What about using the grill? Would that work? My husband placed the turkey (in the pan) on the grill to see if the lid would close. It did. Since it was already Thanksgiving morning, I frantically searched the Web for turkey grilling instructions. After finding several versions, my husband and I created our own variation.
All of our guests showed up. We announced that the turkey was on the grill. Amazed, all the men went out onto the grilling deck to witness what they'd never seen before -- a turkey on the grill!
They didn't bother with the games on TV, they wanted to watch the turkey. There was a problem with that. The guys kept opening up the grill lid to see the turkey! Opening and closing the grill lid slows down the roasting with all that cold winter air. It took longer than expected due to the spectator interference and the meal was still late. However, the results were fabulous and we agreed to grill the holiday turkey in the future.
Fast forward to summer 2007. I was shopping for a new gas grill for my husband's birthday. After all, if he was going to grill the turkey from now on, he needed a better grill.
I asked the salesman if grills came with windows. No.
I asked if I could buy a "turkey cam." He laughed hysterically! No, they don't make cameras for the inside of a grill.
I bought the grill in spite of the lack of desired features.
A few days later, I went to my favorite kitchen gadget store. Telling the salesperson about the problems with the spectacle of turkey grilling, she had a brilliant idea...buy a remote digital thermometer!
When I enthusiastically presented that thermometer to my husband, he was skeptical. Very skeptical. I was tempted to return the thermometer with such a reaction, but we kept it. It was several months later before the debut of the remote thermometer at Thanksgiving 2007.
I prepared the fresh turkey by rubbing it with olive oil and Herbes de Provence--a mix of basil, savory, fennel and lavender. I placed the turkey in a standard roasting pan fitted with a roasting rack. I put chicken broth in the bottom of the roasting pan to create moisture during the roasting process. The culinary sage in the garden was still looking great, so I added fresh leaves to the chicken broth. I handed the turkey off to my husband. He programmed the remote thermometer and agreed to keep the grill lid closed.
I was free and my oven was free! I worked on the side dishes without having to worry about the turkey.
 The remote radio control sat in the kitchen. Several hours later a voice said "your food will be ready in five minutes." The thermometer had worked! We double-checked the temperature with another thermometer and the two agreed...the turkey was done.
The Herbes de Provence and the fresh sage provided great flavor. The turkey was moist from the method of grilling. Our guests all agreed that it was the best turkey...even if they didn't have the fun of watching it grill!
Story by Freda Cameron, November 2009; Photo added Thanksgiving 2008;
My recipe (Your results may vary. I'm not a chef!)
Container Garden: Just Peachy In the Shade
 How do you select plants and flowers for a container garden? I like to walk around acres of greenhouses to see what is interesting for the focal point! Yes, it is time-consuming, but a lot of fun - if you can find suitable plants.
Finding a tall, spiky plant for a shade container almost had me baffled for awhile until I asked for some help at the greenhouse. An indoor plant for my zone 7, Dracaena marginata 'Tricolor', was suggested for my pair of outdoor summer containers. Tropical zones can grow this one outside year round, but I will have to bring these inside to overwinter.
 The beautiful colors in the Dracaena marginata 'Tricolor' gave me cues for companions. The green, white and peachy stripes of the leaves are easy to use in a centerpiece plant. I decided to look for peach blooms and headed for the impatiens section.
 I found a gorgeous impatiens, Fusion Peach Frost, to use as an accent plant. These impatiens were a bit expensive, so I purchased only one for each container. Little did I know that only one of these plants would later take over the large containers to steal all the attention! This is an annual that mounds beautifully and blooms non-stop. The delicate peach blossoms have a darker peach throat. The hummingbirds buzz up onto the front porch to sip from these lovely plants!
 Keeping the budget in mind for the fillers, I selected a cell-pack of begonias for the waxy leaves with deeper orange-pink blooms than the impatiens. This is another annual with blooms that are loved by the hummingbirds.
Merlot Coleus adds a touch of darkness while Red Ruffles provides a touch of orange-red foliage. I already had Red Ruffles growing in my garden, so I lifted a plant or two to stuff the container a bit more.
When I say "stuff" a container, that is what I typically do for annual plantings. However, in the case of using this large impatiens, it's a good thing that I used only one!

For comparison and growth rate, the top photo was taken in late June, one month after planting the containers. The bottom photo was taken in late July, two months after planting. I used a good potting mix and have not fertilized the plants at all since planting in late May. Only the coleus have been pinched back to prevent blooms.
Photos and words by Freda Cameron
Subscribe to:
Posts (Atom)
Popular Posts
-
 By Freda Cameron Although the weather has passed for planting, this is a great time to plan a garden with the children in your family. Durin...
 -
 George Washington's Mount Vernon is a reminder of the self-sufficiency of farms of historical significance. Did you know that Washingto...
 -
 Coreopsis ' Star Cluster ' in bloom with companions Eucomis 'Sparkling Burgundy' ( foliage left) echinacea (multiple...
 -
 The image of a table laden with a bountiful harvest isn't just for Thanksgiving. Local farmers' markets and Community Supported Agri...
 -
 There are few plants in the garden that are virtually maintenance-free. My favorite foliage plant is carex hachijoensis 'Evergold' ...
 -
 I tried to make a garden plan when I spread the soil in fall 2006 to create the outer gardens. I researched and researched the right plant...
 -
 Katie and the Giant Cabbage The idea for Katie’s Krops began with a 9 year old girl and a 40 pound cabbage. In 2008 Katie brought home a ti...
 -
 These "green" disfigured coneflowers were removed and destroyed. I didn't plant any new " green bloom " echinace...
 -
 May I see your identification please? Theft comes in many forms and recently garden bloggers have discovered that there are bad guys who wi...
 -
 By Freda Cameron What is the process of working with a professional garden designer? I asked this question at a local garden center that ha...